Can I Paint My House Myself?
May 18, 2022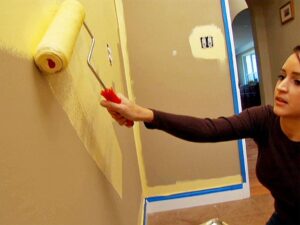
It is not uncommon for home owners to want to put in some sweat equity. Painting your own house can provide such an opportunity. You might not be a master carpenter, an expert mason, or a qualified architect, but the thought of painting doesn’t feel too intimidating to many home owners. Sounds easy right? Purchase some paint and minimal equipment and your almost ready to go…right? Well, just because you can doesn’t mean you should…but maybe.
The first thing to determine is what type of painting is required, interior or exterior? Most commonly, exterior painting will require more advanced knowledge of the painting process, different materials, specialized equipment, and perhaps heights or dangerous situations. Few things can shake a “do it yourselfers” confidence like a 40-foot-tall ladder. Aside from the heights and hazards, issues like carpentry repairs can cause a homeowner to not tackle their exterior painting. Leave the exterior to the professionals. Professional painters can insure that the job is done correctly, safely, and the results will be long lasting.
Interior painting is something many home owners will find more approachable. In fact, many stores, like home depot, cater to these weekend warrior types with great proficiency. Its best to start with a plan. First determine what is to be painted. Are you painting walls, ceiling, trim, doors, windows? Next consider the type of material that is being painted. Is it wood, drywall, composite material? These considerations will help you buy the appropriate paints for the appropriate surfaces. Materials are important but so is color. Take some time to determine that the colors you choose will go well together and with the existing colors of items not being painted like flooring and furniture. Next determine the equipment you will need. A brush, roller, roller carriage, extension pole, 5 in 1 tool, drop cloth, 6-foot step ladder, tape, and plastic will get most common interior jobs completed.
Now that you are properly prepared, its time to prep your rooms. You will first want to move or appropriately cover all your furniture and flooring. You must then take the time to repair any nail holes in the walls or imperfections. Once you feel your surfaces are repaired, cleaned of dirt or grease, you are ready to start painting.
For our example, lets assume you are painting ceiling, walls, and trim in your living room. You will first cut in the edges of your ceiling with a brush. Don’t worry about getting paint on the walls because they haven’t been painted yet. Do make sure you are getting thorough and uniform coverage with your application. Next step is to roll out the ceiling. Typically, a 9-inch roller will get the job done just fine. Also, be certain your floors are covered, because to the inexperienced painter, drips are likely when painting ceilings.
After your ceiling is painted it’s time for the walls. Begin by cutting in the edges. It is incredibly important to have straight crisp lines to maintain the best visual effect once the job is complete. You may find it helpful to mask off the base trim. This will speed the cut process and protect the trim against getting paint on it while you are rolling out the walls.
After your walls and ceiling are finished carefully remove the tape from the baseboards. Wash your brush or grab another brush. Open your trim paint and begin painting your trim. Again, paying careful attention to having clean, crisp lines and uniform coverage. Trim will typically take two coats of paint for best longest lasting results.
Once complete, wash all your brushes, rollers, and equipment very thoroughly. Pick up all your drop clothes and rearrange the furniture. Hopefully, all your work has paid off and you are now able to sit back and enjoy your newly painted room for years to come.